8/14/2016

Love for the Locals: Alberta Mycological Society

Today, P and I visited the "City of Champignons" Wild Mushroom Exposition hosted by the Alberta Mycological Society at the Devonian Botanic Garden. (For those of you who are not Edmontonians, "City of Champions" became the city's slogan after the tornado of 1987.)

Many who know me well, know how much I love mushrooms. 

Things I learned today about mushrooms (courtesy of the Alberta Mycological Society):
- You won't be harmed by touching or smelling toxic mushrooms - only if you ingest them.
- There are 3 main types of mushrooms: edible, medicinal, and toxic.
- Some mushrooms look very similar, but have characteristics like stains or smells that distinguish them. Some differ almost only just by where they are found.
- There is a mushroom that will literally make you laugh to death. 
- Fairy ring mushrooms, commonly found on your lawn are actually edible!
- It's actually better to cook mushrooms before eating them, even if they're from the grocery stores. They contain natural carcinogens, which can be broken down by being cooked.
- While mushrooms in their younger stages can sometimes be identified by being sliced in half, if they are too young, some distinct characteristics may not have developed yet and make "buttons" difficult to identify.
- There are at least 20 common varieties of mushrooms that can be found in Alberta!

A fabulous spread of mushrooms that the Alberta Mycological Society gathered yesterday!
One of the mycology enthusiasts picked up the big white one and said, "this one is edible, but it tastes like wet newspaper".
My favourite table for identifying mushrooms - the edible ones!
They even had a cooking station set up where you could sample two dishes by donation, or pay to order an item on their menu, which offered strawberry enoki soup, mushroom veloute, and corn on the cob smothered in mushroom butter. Having just come from lunch, we opted for the samples, but will definitely consider coming for lunch at next year's expo!
Mushrooms on toast. A lot of garlicky, buttery mushrooms on toast. 
Mushroom risotto topped with a mixture of wild mushrooms and some parmesan!
AMS Director-at-Large, Robert Simpson was our guide on the Mushroom Walk in the Garden, and taught us how to examine and identify different mushrooms found in the Devonian Botanic Garden, particularly the edibles, which I was definitely a fan of! Unfortunately, P and I had to duck out a little early because I was getting eaten alive by mosquitoes in the woods...
I did leave with this beautiful Shaggy Parasol mushroom cap, which I cooked for my dinner tonight! It was bigger than my hand!
Shaggy parasols are very fragile when mature, so you need to take care when washing and preparing it, but it will probably crumble at least a bit anyways.
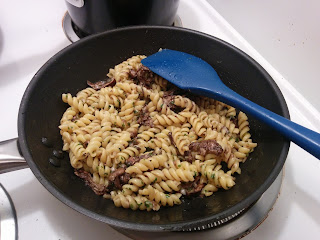
The mushroom actually shrinks down quite a bit, but the flavour is quite intense. I sauteed the mushrooms in some olive oil with chopped garlic and dried thyme, and later tossed it together with some parsley, parmesan, and fusilli. Simple, but delicious!
It was my first time cooking with a mushroom from a foraging trip (also my first foraging trip, period), and it was probably the freshest mushroom I've ever eaten! I will be sure to keep an eye out for edibles upon future walks, so that I can indulge in more of this earthy goodness! :)

-M

7/30/2016

Love for the Locals: Taste of Edmonton 2016

Somehow, the summer has whizzed by! Hopefully some of you have been able to catch the annual Taste of Edmonton!

This year, I was on somewhat of a solo mission. P took an out-of-town friend to the festival on an earlier day, so that they wouldn't miss the whole thing. So, I snagged a full sheet at the "sale price" of $50 for 40 tickets, and split it with a friend instead. P joined me, said friend, and couple others when we decided to go, along with his few remaining tickets.

I tried to be a bit more prepared this year, and brought my own water, while trying to spot restaurants that offered a good ticket to food quantity and quality value. By the end of Sunday, I decided to split my excursion over 2 days, so that I didn't have to worry about packing a lunch on Monday. Working downtown sure has its perks!

Here was my haul from this year:
This year, Farrow Sandwiches made its first appearance! This was their Roast Beef, Horseradish Mayo, Arugula, Pickled Onion, Chips (3 tickets). While its fillings were on point as usual, the bread could have been toasted or something to take it up just a notch.
The Freson Bros. Markets, another newbie offered two types of meat, of which I opted for the Alberta Beef Smoked Brisket w/ Country Hearth Bread & Home Style Pickled Onions (3 tickets). Boy, it was so moist and tender. The pickled onions and dijon mustard complemented it so well, that I didn't even realize until afterwards that the first two plates I tasted consisted of beef and pickled onions.
This was the Spanakopita (Spinach Pie) w/ Tzatziki Dip (3 tickets) from Koutouki It's All Greek To Me. P was looking a little abandoned, and has a strange affinity to spanakopitas, so I took pity on him, threw in one of my tickets, and got one to share. He pointed out that this year's spanakopita was actually better than the one we had a few Taste of Edmontons ago, and he was right! It even changed its shape!
By this time, I was feeling a bit muddled due to how my stomach only had oil, meat, and bread in it, and opted for the Canada Maki (3 tickets) from Kyoto Japanese Cuisine to lighten things up. While P gave me a strange look as I came back with this, it really did hit the spot.
That said, I ended my first day with more meat in the form of Fairmont Hotel Macdonald's Pork Taco w/ Kimchi Slaw & Lemon Thyme Aioli (3 tickets), a reprise from last year, but still pretty good stuff. Now that I think about it, Normand's Bistro, its festival neighbour also had the same offerings as last year. Hmmm...
To start off my lunch the next day, I opted for something my friends got on Sunday night. Pampa served up a mean Garlic Rumpsteak w/ Chimichurri Sauce on Focaccia (4 tickets). It was a pretty decent helping of meat, and flavours were good too!
I had meant to save my last few tickets for La Mar's Shrimp Tostada, but I couldn't find the food truck anywhere, while I still had time to spare. I figured that it just hadn't shown up yet, as other food trucks were still setting up at the time, and ended my lunch break with the Tequila-Lime Chicken Tacos w/ Mexican Rice (3 tickets) from The Three Amigos. Having been there before for dinner, I knew I couldn't go wrong. I admired the choice between mild and hot salsa, which was kind of nice. I got the hot one, of course!
Taste of Edmonton is becoming more costly, and this year's offerings consisted of some repeats, much meat, and many tacos, but it's still a fun way to have a little bit of everything from around the city, while enjoying the sun with some friends. A tip I might have for this year, and potentially for years to come is to maybe bring your own salad.

Go out and grab some grub, but don't forget your sunscreen and/or an umbrella!

-M

7/28/2016

Love for the Locals: JACEK Chocolate Couture

Tonight, chocoholics from all walks of life had the opportunity to take a peek behind-the-scenes of JACEK Chocolate Couture at their open house. JACEK's Cocoanista, Jacqueline Jacek opened the doors of the studio location in Sherwood Park this evening for all to witness and taste the bean-to-bar process first hand.

P and I jumped at the chance and headed east. I have to mention that before P introduced me to JACEK about 2 years ago when the shop on the 4th Street Promenade opened, I didn't really like chocolate. Turns out, I just hadn't tasted the real deal yet. Since that fateful day, JACEK has become my go-to chocolate shop, where I purchase chocolate for myself and ship some to my friends across the country. It is clear that Jacqueline pours her heart and soul into the product of combining her two joys; fashion and chocolate.

A few months ago, Jacqueline graced the crowd at Nerd Nite with her presence, where she gave a 20-minute run-down of the process of chocolate making in a talk entitled, Chocolate: Sweet truths, bitter myths, and tantalizing wonders. At the open house, we got to take our sweet time, literally every step of the way.

A storm may have been brewing outside, but another chocolatier storm was brewing inside this fine establishment.
The self-guided tour started with a bottle of water and some hand sanitizer! Don't worry - neither of those go into the chocolate. They just help us prepare for what's to come.
Crack open a cocoa pod, and out pour the cocoa beans!
After the cocoa beans are sorted and roasted, the bitter outer shells are removed to reveal the delectable gems that are cocoa nibs.
Behold! The result of 6 hours in cocoatown.
After 72 hours, the cocoa nibs become this glossy, magical goodness. It's wrapped and rests for about a week, and then it's ready to be transformed into one of the many confections that JACEK offers on the regular.
The tasting continues... samples of chocolate from cocoa beans of varying origins - the 90% and 70% Dominican Republic, 70% Colombia, 70% Peru, and 70% Venezuela (i.e. JACEK's fabric chocolate - the bases for the bean-to-bar products). Alike wine tastings, and apple picking farms, until you taste them one after the other, you don't really get the chance to pay attention to the different notes of fruitiness and richness. By far, the favourite for both P and I was the 90% Dominican Republic! It was very rich and intense in a very, very delicious way. 
Samples of fabric chocolate paired in ingeniously simple ways; the Venezuela with aged Gruyere de Comte cheese, the Dominican Republic whipped into a chocolate mousse topped with chocolate-coated wafer balls, and the Peru melded with scalded cream to make the perfect sipping chocolate.
The fabric line, "accessorized" - the Venezuela with Fleur de Sel, the Peru with Almonds, and the Dominican Republic with Rock Sugar. All 3 were amazing, but the Dominican Republic remained the front runner for P and I.
I came away from this open house, feeling even more knowledgeable about the process and passion that goes into JACEK Chocolate Couture. The moral of this story: if you haven't already, I highly recommend trying any one of JACEK's products. You can start off with JACEK's newest line from this summer, the Picnic Basket Collection
Left to right: Lemonade, Chocolate Dipped Strawberry, Citrus & Basil, Olive Oil & Balsamic, Carrot Caramel, Classic Truffle - 70% Dominican Republic. Photo from JACEK Chocolate Couture shop website.
Just beware... once you start, you might never stop.

-M

4/12/2016

Cravings: Mushrooms

There are two foods that I will probably never get sick of - potatoes and mushrooms. I absolutely love mushrooms. The only kind I don't like are called straw mushrooms. To me, they are gross, and for much of my childhood, I saw a Chinese dish full of them when we went for dinners with family friends...but back to why I love mushrooms!

Things I learned today about mushrooms:
- Mushrooms are freaking awesome, but I knew that already.
- Mushrooms don't have any chlorophyll like their many veggie cousins, so they don't need sunlight to grow! What beasts!
- Check out this amazing list of facts about mushrooms, and/or learn how to grow your own mushroom farm!
- Superior Mushrooms in Ardrossan is Alberta's oldest mushroom farm. I should visit them one day...

I stayed at home today for a mental health day off from work, and decided to lay on the comfort with a wonderfully, decadent, mushroom-y lunch. 

Jumbo white mushrooms from Superstore. Toaster oven for scale.
Serve with your choice of starch and green to keep it vegetarian, or throw in some protein to unleash your omnivorous side! I opted for a mashed potato and some green salad drizzled with Garlic EVOO and Cask 18 balsamic from Oliv Tasting Room.
Stuffed Mushrooms
**Makes 2 servings**
6 large white or cremini mushrooms
4 cloves of garlic
5 Tbsp Mushroom Extra Virgin Olive Oil (from Oliv Tasting Room)
4 wedges of The Laughing Cow Garlic & Herb
A toaster oven

1. Line your toaster oven tray with parchment paper.
2. Carefully remove the stems from the mushrooms so that the caps stay in tact. 
3. Brush about 2 Tbsp mushroom oil all over the mushroom caps, and place them upside down on the tray.
4. Set the temperature to 350 F and bake the mushroom caps for 10 minutes.
5. Meanwhile, finely chop the mushroom stems and garlic. 
6. Add 2 Tbsp mushroom oil to a pan over medium heat, and lightly fry the mushrooms and garlic. 
7. In a small bowl, add the cheese wedges, and pour the hot topping over them. Mix until evenly combined.
8. Evenly distribute the filling between the mushroom caps. Drizzle with the remaining Tbsp of mushroom oil, and put them back into the toaster oven. 
9. Change the setting back to toast/450 F and bake for 5 minutes until slightly browned on the tops.
10. Remove from the toaster oven and enjoy. 

Super quick and easy, not to mention tasty! Great for appies, party food, and well, I guess lunch.

-M

P.S. I can assure you that I am not being paid to promote Oliv Tasting Room products. I am just obsessed with them.

4/10/2016

Cravings: Tagliatelle

I managed to get my hands on some delicious, fresh pasta from the Italian Centre, which comes in 3 bundles. There's also a note on the back that says that the pasta is "to be consumed after cooking within 3 days of opening the package". Challenge accepted.

Things I learned this week about fresh pasta:
- Even though some dried pasta is pretty good (I like Barilla, and some other Italian brands I've found at Winners and HomeSense), fresh pasta is wayyy better taste-wise and texturally.
- There are multiple theories about how pasta came to be.
- A non-profit association called the International Pasta Organisation was formed to "increase pasta consumption and awareness"!
- There are so many kinds of pasta out there, that aren't the standard types you find in North American restaurants. While I will still admittedly gravitate towards spaceship and dinosaur shaped pasta at times just because, I'm excited to try some different ones - notably orecchiette and campanelle! Perhaps, I'll even try making my own... Need some inspiration? Check out this video featuring Gennaro Contaldo! I'm obsessed with his video on making Gnocchi Al Forno. I have got to try it one day...

And without further ado, I present to you - Tagliatelle, 3 ways!

1. Keeping it classy
Tagliatelle Bolognese. Food for thought: Tagliatelle actually holds the sauce on it better than spaghetti, because spaghetti is round, while tagliatelle is flatter. 
Tagliatelle Bolognese
**Makes 2-3 servings**
1/2 lb lean ground beef 
1 tsp Red Alder Smoked Sea Salt (from Silk Road Spice Merchant)
3 cloves of garlic
1/2 tsp freshly ground black pepper
1/2 cup water
1/4 medium onion
1/2 can of diced tomatoes
3 Tbsp of Garlic Extra Virgin Olive Oil (from Oliv Tasting Room)
A pinch of dried or fresh chopped parsley 
1-2 tsp flakes or grated parmesan cheese
1 bundle of freshly cooked tagliatelle (from Italian Centre Shop)

1. In a bowl, mix smoked salt and black pepper evenly into the ground beef.
2. Add 2 Tbsp of the olive oil into a saucepan over medium heat. 
3. Finely chop the onion and garlic and cook in the pan until translucent and fragrant.
4. Crumble pieces of the ground beef mixture into the pan and cook until no longer pink.
5. Add the tomatoes and water, and stir until combined. 
6. Simmer over low-medium heat for about 45 minutes until the sauce is no longer liquidy.
7. Turn off the heat, and drizzle 1 Tbsp of garlic olive oil over the sauce, and stir it in. 
8. Serve over freshly cooked pasta. Garnish with some chopped parsley and/or parmesan cheese. Buon appetito!

2. Tossing things up
Tagliatelle Aglio e Olio con Gamberetto (i.e. Garlic and oil tagliatelle with shrimp). A simple tossed pasta, but hella delicious.
Tagliatelle Aglio e Olio con Gamberetto
**Makes 2 servings**
1/8 cup unsalted butter
3 Tbsp Garlic Extra Virgin Olive Oil (from Oliv Tasting Room)
1/2 cup frozen baby shrimp
3 cloves of garlic
1 1/2 tsp freshly ground black pepper
1 1/2 Tbsp parmesan cheese flakes
A pinch of chili pepper flakes
A pinch of dried or fresh chopped parsley
1 bundle of freshly cooked tagliatelle (from Italian Centre Shop)

1. Melt butter in a saucepan with 1 Tbsp of olive oil over medium-low heat.
2. Add in baby shrimp and toss and stir until cooked through. Meanwhile, slice the garlic.
3. Add in garlic and parmesan and stir until garlic is fragrant.
4. Season with black pepper and chili pepper flakes to your liking.
5. Add 2 servings of freshly cooked pasta into pan, drizzle with remaining 2 Tbsp of olive oil until just combined.
6. Serve and garnish with chopped parsley, and more black pepper, chili flakes, and parmesan to your liking. Buon appetito!

3. Diverging from the norm
Tagliatelle Crack Slurp. Italian by sight, Chinese by taste. A somewhat trippy dining experience, but pretty damn tasty.
Tagliatelle Crack Slurp (Adapted from Lady and Pups)
**Makes 2 servings**
2 chicken thigh skins
1/3 cup + 1/8 cup Garlic Extra Virgin Olive Oil (from Oliv Tasting Room)
1/6 lb of lean ground beef
1/4 tsp sea salt
1 tsp + 1/4 tsp ground white pepper
4 cloves of garlic
1 green onion
1 bundle of freshly cooked tagliatelle (from Italian Centre Shop)
2 Tbsp gochujang
2 Tbsp soy sauce
1 Tbsp dark soy sauce
1 tsp apple cider vinegar
1/2 tsp white granulated sugar

1. Toss the tagliatelle with 1/8 cup olive oil to prevent the noodles from sticking, and set aside.
2. Roll the chicken skins into two logs and freeze for at least a couple of hours.
3. In the meantime, prepare 2 soup bowls with seasoning sauce. Combine 1 Tbsp gochujang, 1 Tbsp soy sauce, 1/2 Tbsp dark soy sauce, 1/2 tsp apple cider vinegar, and 1/4 tsp white granulated sugar in each bowl, and set aside.
4. Thinly slice garlic and set aside. Chop green onion, and set aside.
5. Remove the chicken skin logs from the freezer, and slice into tiny spirals.
6. In a pan over medium-low heat, add the chicken skins. Occasionally stir the chicken skins so that they don't stick together. Once brown and crispy, remove with a mesh strainer ladle, and set aside. Season right away with salt and 1/4 tsp white pepper.
7. Add the garlic olive oil to the pan with the chicken fat oil.
8. Over medium-low heat, add the garlic. Stir the garlic constantly until browned and crispy, and remove with a mesh strainer ladle, and set aside.
9. Add 2 Tbsp of the chicken fat garlic oil into each of the bowls with your seasoning sauce.
10. With the leftover oil, crumble and cook the beef until no longer pink. Season with 1 tsp white pepper.
11. Add half of the ground beef into each of the bowls, and stir until it is coated evenly with the seasoning sauce. (I used the oil from after cooking the beef to also fry up some Shanghai bok choy too!)
12. Add a serving of tagliatelle noodles into each of the bowls and toss until combined.
13. Top each bowl with fried chicken skin, fried garlic, and chopped green onion, and devour. chī chī chī!

I'm not sure which was my favourite tagliatelle meal, but I know that I enjoyed each one very much! Have you had any recent adventures with tagliatelle or another kind of noodle? Let me know!

-M

2/24/2016

Love for the Locals: Wheat Garden Noodle & Dumpling Bazaar

Normally, my Muslim friends aren't able to enjoy non-vegetarian dishes in Chinese restaurants because the meat is not Halal. When talking about food, Halal refers to meat that is hand-slaughtered (as opposed to being by stun gun and butchered by machine), and a diet free of pork and alcohol. (For more information about Halal, you can visit Canadian Halal Foods.)

That aspect of the Edmonton food scene changed very recently with the opening of Wheat Garden Noodle & Dumpling Bazaar (10703-103 Street, Edmonton, AB) just last month. Wheat Garden is a quaint little restaurant in the heart of Chinatown that serves traditional northern Chinese noodle, rice, and cold dishes, and all of their food is certified Halal!

Wheat Garden Noodle & Dumpling Bazaar is situated where the Old Szechuan Restaurant used to be.
Shortly after hearing about its existence, my friend, Wajeeha of W.S. Photography jumped at the chance and planned a lunch. She, along with other Muslim Edmontonians, usually doesn't get to eat meat-based dishes in Chinese restaurants, because they aren't prepared with the appropriate Islamic dietary restrictions in mind, so she typically replicates them as best as she can in her own kitchen. However, she made a good point - that she doesn't have a frame of reference to compare her dishes to. I was curious to see how it compared to other Chinese noodle and dumpling shops I had been to, and I hadn't eaten northern Chinese food in quite a while, so I was eager to join in on the adventure. We had to wait until the weekend when all of us were available at the same time, but it was well worth the wait (even though it ended up just being 3 of us). Wajeeha brought her camera too! All of the photographs from inside the restaurant were taken by her!

The interior of Wheat Garden looks similar to your typical Chinese neighbourhood restaurant, but with more natural light coming in from the windows. It wasn't too busy near the end of the lunch hour, so Wajeeha was able to snap a few shots of the empty eatery without getting strange looks from other dining customers.
The furnishing is quite simple with a few shelves from IKEA and a couple of TV screens to play Asian dramas and music videos on. Each table has WiFi access information for their customers to use! 
While we waited for another friend to join us, Wajeeha and I ordered the Dumplings All-in-One ($13.99) plate, which is essentially a combination plate of the various homemade dumplings they offer. Fillings included beef, lamb, shrimp, and chicken mixed with carrot, cabbage, or parsley! All winners. It was the first time I ever had lamb in a dumpling, but it was an interesting experience nonetheless!
The dumplings paired very well with the Chinese black vinegar... Mmm... (Also modeled in some of these photos is my souvenir from my visit to Boston last summer.)
I opted for the classic Beef Soup Noodle ($11.99). The broth was a very classic Chinese beef broth with thin slices of beef, daikon radish, chopped leek and parsley, with a little dab of their house-made chili oil.
The noodles were most definitely house-made. They had the perfect texture...so smooth, and delicious. There are actually 4 types of noodles that you can select from on the menu, varying in thickness and width, but I'm betting they are equally as mouthwatering.
Both Wajeeha and Samaiya opted for the Soup Noodle with sliced beef in hot and sour soup. With a trade for a spoonful of my broth, I got to try the hot and sour soup as well. It was delicious too, with a peppery kick at the end.
The verdict? I am definitely coming back. Not only can I dine on authentic northern Chinese noodles and dumplings for a reasonable price, but I can bring all my Muslim friends with me! I can't wait to try the other menu items, and for their business to pick up!

This lunch really got me thinking though. We chatted about the other Chinese eateries in Edmonton that are Halal friendly, and how they're usually some sort of fusion cuisine, rather than pure and authentic Chinese food - apparently we have a Chinese-Caribbean restaurant in town?? There are also quite a few places that claim to offer Chinese or Pakistani foods aren't necessarily authentic, and it's a bit cringe-worthy to know that some people think that eating rice with soy sauce is an thing that we do. Did you know that a real Kashmiri Chai is supposed to be light pink in colour? My mind is blown! I'm not naming names, because regardless, that stuff is still delicious.

But here's to you, YEG! Where should I go for some authentic South Asian food? Bengali, Bhutanese, Indian, Nepali, Pakistani, Sri Lankan...I want to know it all!

-M

P.S. A big shout out to Wajeeha for the awesome photos! Please check out her website, Facebook page, and follow her on Twitter!

Wheat Garden Noodle & Dumpling Bazaar Menu, Reviews, Photos, Location and Info - Zomato

2/08/2016

B-b-b-baking: Year of the Monkey

Good evening...

This was a super last minute post, but the baking was a very spur of the moment thing.

Over the weekend, I was humming and hawing over what I should bake to celebrate Chinese New Year. Unfortunately, I'm also at the shorter end of the stick budget-wise at the moment, so I had to think frugally. It turned out that I had all the ingredients I needed to make pineapple tarts except pineapple, so that's what I went with.

What I learned tonight about Chinese New Year and pineapple tarts:
- Pineapple tarts are actually more Singaporean or Malaysian, but are generally eaten for Chinese New Year.
- Pineapple tarts can be made open-faced or enclosed in a rectangular shaped cookie. A couple of years ago, I made the closed kind, but failed to document it. They turned out quite well, but I don't remember how I made them or which blog(s) I was reading at the time...
- Chinese New Year celebrations last for about 2 weeks (15 days). Forget one night of fireworks, and bring out the food and dancing lions!

I sort of followed a recipe for the pastry dough, but made a thumbprint cookie instead, because I didn't have the fancy cookie cutter/stamp that's generally used for these. I opted out of chilling the dough after forming it. I also opted out of caramelizing the pineapple to the point where it is pliable. (I was tired, but wanted to consume the end product.)

Impromptu thumbprints, after the eggwash.

Overfilled with pineapple and ready for the oven!
I got too excited that they were done, and got halfway through one. Sorry.
Pineapple "Tarts" (Adapted from ZaTaYaYummy)
*Makes 20 thumbprint cookies*
Pastry dough:
1/2 cup shortening
1/4 cup icing sugar
1 1/2 cup all-purpose flour
1/8 cup tapioca starch
1/2 tsp salt
1 egg
1 egg yolk
2 tsp water (optional - I did this because the air is drier here)

Egg wash:
1 egg yolk
1 tsp water

Pineapple filling:
1-14 oz. can pineapple chunks
1/4 cup granulated sugar

1. Preheat your oven to 350 F and line a baking sheet.
2. Drain the can of pineapple chunks, and pulse in blender (or Magic Bullet!) a few times.
3. Empty pineapple into a saucepan with sugar, and stir over medium heat until a good amount of moisture has evaporated. Set aside.
4. In a medium-sized bowl, combine shortening, all purpose flour, icing sugar, tapioca starch, and salt. Stir in egg and egg yolk.
5. Knead just enough to bring the dough together. If the dough is too crumbly, add water a little bit at a time.
6. Form into 20 teaspoon-sized balls, and press down gently in the center of each with your thumb. Fill each thumbprint with pineapple (I used a teaspoon to do this).
7. Bake in the oven for 15-20 minutes.
8. Allow to cool before enjoying, because they will be hot and fragile. You have been warned.

Happy Year of the Monkey!

-M